Friday, January 18, 2013

222 DIY Cereal Box Drawer Dividers

Home Office month is in full swing!  And it's not just about the papers.  And paper piles.  And filing.  And paying bills.  It's also about the area you do your work within.


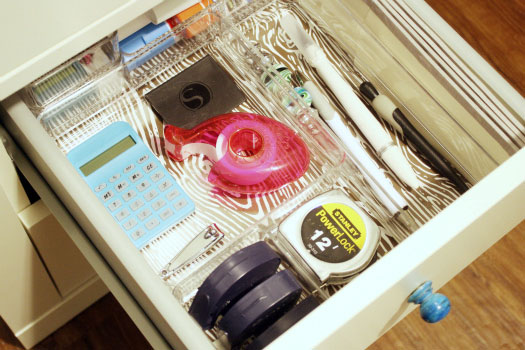
My desk is pretty neat and tidy and I have been really happy with how the organization has held up over the last year plus, however, there was one drawer....

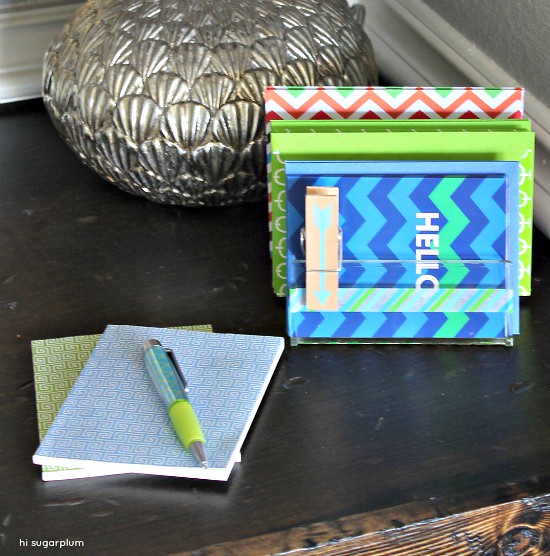
It used to look nice and lovely!  My favorite acrylic drawer organizers and all!


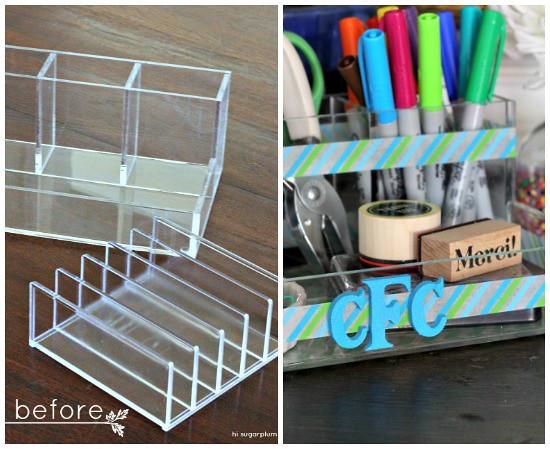
But then one day, I decided I would rather use the acrylic dividers in my vanity for a fun project, and that I would address the desk drawer at a later date.  Almost five months later, it was time.  Here is a true life story of how drawers can suffer once dividers go bye bye:


Eeek!  Dumping ground!  Everything I use at my desk was being tossed right into the drawer.  I couldn't even tell ya what was at the bottom of the messy mess.  At least my pencil pouch was sort of acting like a divider, no?

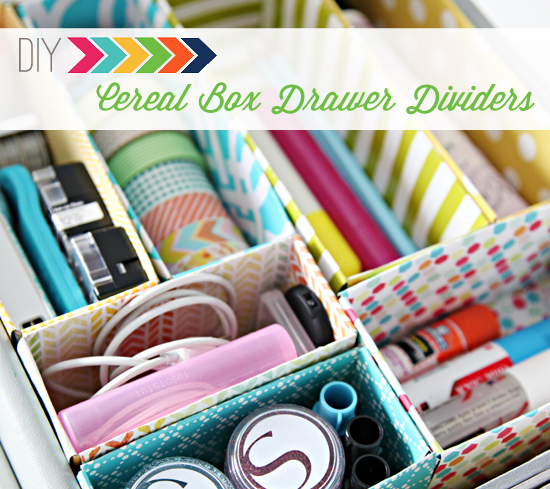
Thank goodness for this month's challenge, because I am beyond words smitten with the outcome of my little drawer organizing project.  Here is what I used to DIY some super cute drawer organizers:


Pretty papers, {both wrapping and decorative cardstock}, regular tape and double-sided, pencil, scissors, box cutter and a yard stick.

Over the last couple of weeks, I have been collecting leftover food boxes such as those from cereal, waffles and granola bars.  Once I had enough to play with, I popped them into the drawer to see how I could use them as dividers to reorganize my madness.


Once I had my desired location for each of the boxes, I used the drawer as a guide to mark the height around each edge of each box.


Then, using the box cutter, I cut the boxes!


The next step was to slice down the decorative paper {any pretty paper will do}.


There are plenty of ways to wrap a box with paper, and after a few completed dividers I definitely had a system going.

I started by using a thin strip across the bottom, attaching it to the box with double sided tape.


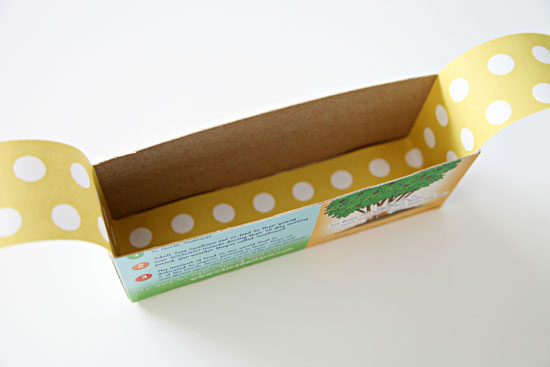
Then I used a pencil eraser to push in the creases around the inside edges {carefully so the paper wouldn't tear}.

Once the first strip was taped down nice and tight, I repeated the same step the opposite direction.


Again, pushed in the inside edges with a pencil eraser and taped it all down.  I did find that it was easiest to do my creases/folds before taping, vs. trying to work around the tape.


All done!


Love polka-dot.  Seriously, obsessed lately.

Anywho.  Here they are all together in their happy new home.


So cute I could barely stand it!  I didn't even want to fill them up they were so darling!  Love love lovity love!


But, after oohing and aahing for a little bit, I refocused and started organizing.  I purged, put things back where they belonged and the rest of the items found themselves in their new brightly colored cereal box drawer organizers.


Everything had a home and was paired with like items.  Oh happy day!  No more messy drawer!


And just because I know you all want to see it in it's real live location, here is what I get to peek at now when I am working away and need to grab some hand cream or a highlighter:


One of my favorite projects yet and all using materials I already had and re-purposing food boxes.  Who knew?

I will always have a love for acrylic drawer dividers, but I now also have a new found love for leftover food packaging too!

What out of the ordinary objects do you use to keep your drawers tidy?  Yogurt cups?  Flea market bowls?  Shoe boxes?

Thursday, January 17, 2013

29 UHeart Organizing: Cheerful Desktop Storage

I have been loving the emails, links and posts surrounding Home Office month!  Everyone is getting involved and it's making it much more fun and exciting to work on the projects!

Today, my cute crafty contributing friend, Cassie from Hi Sugarplum, is here to share how she prettied up her workspace in a super simple and darling way!


Hello everyone!! I hope you're having a fabulous start to the New Year, and riding the organizational wave that always comes in January! Don't you love that resolute feeling to get your house under control? I've been taking advantage of my new-found motivation while it lasts, starting with our bathroom cabinets.

But the organizational bug isn't the only thing biting. After a holiday filled with family and friends, I'm reminded just how important these people are to me. And no matter how busy our lives get, I want them to always feel like a priority. These are the days of texts, e-cards and an overload of emoticons, but nothing beats receiving a good old-fashioned note in the mail; full of love, personality and thoughtfulness.

And since it's Home Office month around these parts, I decided to create a cheery little desk nook, stocked with all the essentials.


{DIY} Custom Desk Accessories

My day-job confines me to a computer, in a gray and window-less cubicle. So I wanted a space at home that was bright, cheerful, and full of all my favorite colorful supplies. Since I'm an incurable diy-er, of course I decided to create my own accessories! Lucite has been the rage in home decor for awhile, but inexpensive acrylic gives the same look for a much lower price tag. You can find them at most office supply stores, Target, WalMart, and sometimes even the Dollar Store. Don't overlook the Bathroom and Kitchen departments when looking for office supplies...this is actually a Cosmetic Organizer. The other is a Letter Sorter...both from The Container Store.

{DIY} Custom Desk Accessories

First I covered the bottoms with zig-zag washi tape, giving it a chevron look.

{DIY} Custom Desk Accessories

Then wrapped a few strips of striped tape in coordinating colors around the sides. It removes easily, so when I'm ready for a change or new color palette, it'll be easy-breezy!

{DIY} Custom Desk Accessories

Is it just my Southern roots, or is everything cuter with a monogram? I picked up these little wood letters at the craft store, and gave them a few coats of paint.

{DIY} Custom Desk Accessories

After super-glueing them to the front, I've got the cutest office caddy, created just for me!

{DIY} Custom Desk Accessories

{DIY} Custom Desk Accessories

I love the peek of chevron through the clear acrylic.

{DIY} Custom Desk
Accessories

Filled with all my favorites, I've got everything at my fingertips in my own little corner (kind of like my daughter's Craft & Reading Corner!) This spot has quickly become my sanctuary for writing notes, filling out paperwork, brainstorming blog ideas, and tracking the family calendar.

{DIY} Custom Desk
Accessories

{DIY} Custom Desk Accessories

{DIY} Custom Desk Accessories

My {DIY}Confetti Vase pretty much follows me around the house...I love having it nearby when I'm working!

{DIY} Custom Desk Accessories

I have a weakness for cute notecards, and the dollar bins at Target and Michaels never disappoint.

{DIY} Custom Desk Accessories

{DIY} Custom Desk Accessories

We live for Before & Afters, right?! These plain, inexpensive organizers made quite the transformation...and it only cost a few dollars!

{DIY} Custom Desk Accessories

This corner of our Family Room is my pride and joy, since it used to be a wet bar, and the walls were orange...then I made the chunky desktop and distressed shelves myself! You've come a long way, baby!

{DIY} Custom Desk Accessories

Have you jazzed up any office supplies lately? Is there anything nicer than receiving an actual note in the mail? Thanks for having me, and I'll see you next time!


"Hi, I'm Cassie, a DIY and design-obsessed Texas girl, and lover of travel, fashion, sarcasm and Mexican food. When I'm not hanging with my sweet and funny family, you can find me kicking the '80s out of our home, one budget project at a time, on my blog Hi Sugarplum!"


Wednesday, January 16, 2013

28 Reader Space: A Multipurpose Mudroom

I have said it before and I will say it again.  Mudrooms are a luxury that most of us don't have.  Some homes are smartly built with a whole room devoted to entry and storage, but for the rest of us, we need to get creative with our entry spaces.  Reader, Jessica from Four Generations Under One Roof, is here today to share how she created a multipurpose mudroom where there once was none.


Here is the beautiful girl now for a quick interview to share more about her delightful space! 

What is the main function of the space? 

"The main function of the space is to keep a ridiculous amount of coats and shoes organized. Our home doesn't have a lot of closet space, add that to four generations living together under one roof, means you need to get creative and use every existing wall, nook and crany you have to create storage solutions. Prior to dedicating an entire wall to coats and shoes, everything was dumped on the floor or chairs. Finally after having a million anxiety attacks and coming to the conclusion that purchasing a large locker style storage beast was not in our budget, I decided to create a wall dedicated to coats and shoes."


Any superstar tips for keeping it organized? 

"Purge the wall and shoe box on a weekly basis. Everyone loves to hang "other clothing" and place "random objects" in the shoe box. Because the wall isn't enclosed, it can get overly messy looking quickly. By ensuring that only the "daily coats" and "daily shoes" are there, it keeps it organized looking."


What items did you find essential when organizing the space?  And why? 

"Heavy duty coat hooks. Backpacks, work bags and winter clothing are heavy so large heavy duty hooks were a must. Some pine wood to customize the old toy box in an effort to minimize the shoes being piled on top of one another."


What did you do to go the extra mile and "make it pretty"? 

"I didn't want to have just random hooks on the wall and a pile of coats to look at. My goal was to give the appearance of a dedicated mudroom. In an effort to add texture and character to the walls, I purchased inexpensive MDF and some pine boards to add a board and batten treatment to the walls. The room has minimal natural light so I painted the lower portion a crisp white and the top walls the same blue/green color in the adjacent room."


Where did you find your inspiration? 

"By searching mudroom designs on pinterest, online magazine websites and google images. My roadblock was that this room was bigger than a traditional "mudroom" that you see in magazines and online design spaces. This room is a transitional room (the old family room) between the kitchen and family room so I struggled before I came to the conclusion that I needed to stop trying to make the room a room that it wasn't. Does that make sense? It was never going to be a perfectly designed traditional mudroom so I started to look for spaces online that had a wall dedicated to coats. I came across many kitchens that had built-in's, locker style cabinets, within their kitchen so that is what gave me my inspiration. Someday I hope to build around this hook area that I have created and DIY some locker styled cabinets with doors!"


What items did you DIY to stay on budget? 

"Everything! I added the board and batten to the walls myself, added hooks and customized an old toy box by adding wooden cleats {cutting small pieces of 1x2 pine} to the inside of the box for the shelf to rest on {piece of pine 1x10 pine}."


How has it impacted your life for the better? 

"Less anxiety about stuff piled on the floor and thrown on nearby furniture!  Now I can see the floor and actually sit on the chairs. Everyone has their own hook which helps keep things organized."

Too much to adore in one super happy and functional space!  How about a final before and after?


Amazing right?  No budget to purchase large locker systems.  No time or resources to completely build in walls and create a divided mudroom.  So why not use what you have, along with some elbow grease and create something even better?  And when you have four generations living under one roof {oh yes, you read that right}, a little organization goes a loooong way!

Huge high fives to Jessica for getting her DIY on and creating a masterpiece of a space.  Every last detail is gorgeous and now we can use her multifunctional mudroom as our inspiration!  You can find more photos and details on her blog here.

Anyone else DIYing something from nothing?


ATTENTION!!  Want to be featured in a Reader Space edition?  Have an awesome organizing story to share?  I am looking for projects that have made a positive impact to your life.  Please submit your story and photos here and I would heart to feature them right here, on the blog!!  Photos should be high resolution and unedited.  Please include a description of the project, including any costs, inspiration, and how it has changed your life and routine for the better!  Oh, and no worries my friends, we will NEVER judge "before" pictures because that just wouldn't be nice!  Only love goes on at this blog!

Tuesday, January 15, 2013

12 IHeart: Simplifying Paper Clutter & a GIVEAWAY!

Since many of you made resolutions/goals to get organized in 2013, I am excited to be bringing you giveaways to lend a helping hand.  This week is no exception, as simplify 101 is here to giveaway some major organizing assistance!


Did you resolve to make 2013 your year get your paper clutter under control? You’re not alone! In fact, paper clutter is one of the most common reasons people inquire about simplify 101’s workshops and organizing services! One lucky reader will win a spot in their upcoming Organize Your Paper Clutter online workshop!

 
About The Workshop:

In the online workshop, simplify 101’s professional organizer Aby Garvey will guide you through the process to...
  • Create new habits that will make paper clutter a thing of your past!
  • Find out the best ways to organize and store each type of paper in your home, so you can find it again right when you need it.
  • Find out exactly where to start organizing your paper, and get a step-by-step plan to navigate your way through your entire paper backlog. The process is bite-sized and focused, so you won’t get overwhelmed.
  • Deal with your most important paper first. {Say goodbye to sleepless nights worrying about misplaced bills and other documents that have gone missing in the stacks.}
  • Find out how to make certain your systems continue to work for you going forward. This is a simple, but often overlooked step in the organizing process that will help ensure your efforts in this workshop continue to pay dividends {in the form of clutter-free surfaces} going forward.

When you complete this workshop, you’ll know how to organize every piece of paper in your home, plus you’ll have simple-to-use systems that will eliminate your paper clutter. Your piles {and your stress} will be replaced by organizing systems you love, along with feelings of confidence, relief and peace of mind!  Organize Your Paper Clutter begins January 17, 2013. Click here for more information on Organize Your Paper Clutter and other available online and self-paced workshops. 


Simplify 101 is offering iHeart Organizing’s readers 15% off all current online workshops and instant downloads in their shop. Enter coupon code HT15 at checkout. This offer is good through Jan 21, 2013 and can't be combined with other offers.

Simplify 101’s mission is to make getting organized fun! In addition to online workshops, simplify 101 offers organizing tips and ideas, self-paced workshops, and one-on-one coaching. Get a taste of simplify 101—and the organized life—with their FREE, simple-to-follow guide How to Create a Command Central Binder. You’ll put together a home reference binder that will help you get organized, save time, and minimize paper clutter and the stress that comes along with it! Visit simplify101.com for more, and follow them on Pinterest, Facebook and Twitter!


 IHeart Organizing official giveaway entry rules can always be found here.